Author name: azwindowservices

How Long Does It Take To Pressure Wash A House?
Blog

How Long Does It Typically Take To Pressure Wash A House?

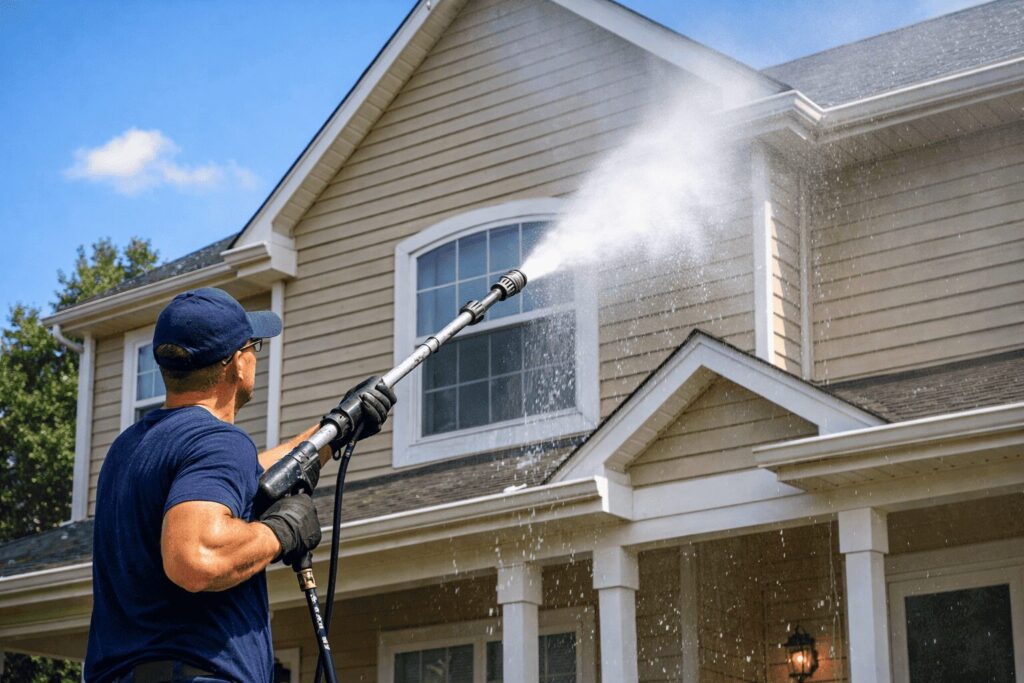
If you’re planning to pressure wash your house, timing matters. You might be coordinating work schedules, preparing for guests, getting ready to list your home, or trying to knock out an HOA request without turning your weekend upside down. In most cases, a professional house wash can be completed in the same day. But “how long” depends on more than just your home’s square footage. Stories, access, surface type, and how much buildup you’re dealing with can change the timeline significantly. At AZ Window Services, we keep expectations clear from the start. Below is a practical guide to typical timelines, what affects them, and what your service day usually looks like—especially for Arizona homes that deal with desert dust and monsoon grime. Typical Time Ranges For House Washing Most homeowners want a straightforward range they can plan around. The best way to think about timing is “total appointment time,” including setup, washing, rinsing, and final touch-ups. Small Homes (1,000–1,500 Sq Ft) For a smaller one-story home with straightforward access, house washing typically takes about 2–4 hours. If the exterior has light dust film and minimal detail work, it can land closer to the lower end. If there are tight side yards, lots of small architectural angles, or heavy buildup on shaded areas, the job may push toward the upper end of that range. Average Homes (1,500–2,500 Sq Ft) For many Phoenix Valley homes in this size range, a typical timeline is 3–6 hours. This often includes a mix of standard exterior walls, some detail work around doors and windows, and a careful rinse-down. If the home is one story and accessible, it may finish in half a day. If it’s two stories or has extensive exterior features, it’s more likely to take most of the day. Large Homes (2,500–3,500+ Sq Ft) Larger homes often take 5–8+ hours for a full exterior wash, especially when the home is two stories or has tall entryways, multiple rooflines, and a lot of corners and trim. When the scope includes heavy buildup or multiple add-ons, a large-home wash can become a full-day job. In certain cases, it may be scheduled as a longer appointment. The “One-Day” Rule Of Thumb Most professional exterior house washing is completed within a working day. If your home is two stories, has significant buildup, or includes multiple additional surfaces, that’s when the day can stretch longer. The best way to avoid surprises is to confirm whether your estimate includes just “wash time” or the full appointment from arrival to final check. What Counts As “Time” (Wash Time Vs Total Appointment Time) This is the biggest reason you’ll see different answers online. Some people quote only the time water is on the walls. Others quote the entire visit, including setup and finishing detail. Setup And Walkthrough Professional work starts with a quick walkthrough and staging. That includes confirming the scope, checking access points, identifying problem areas, and setting up equipment and hose runs. This portion is usually quick, but on larger properties it takes longer simply because there’s more ground to cover and more areas to plan. Surface Prep And Protection Before washing begins, we’ll take simple precautions to protect your property. That might include making sure sensitive areas are covered appropriately and that the work zones are safe and clear. If furniture, decor, or outdoor items need to be moved out of the way, that can add time. It’s not complicated, but it matters for doing the job cleanly. Application And Dwell Time Cleaning solutions need time to work. That dwell time is part of why some jobs take longer even when the home isn’t huge. A good wash isn’t about blasting the surface. It’s about loosening buildup so it lifts away cleanly during rinsing and finishing. Rinse, Touch-Ups, And Final Check The rinse-down and detail pass often take more time than homeowners expect. This is where we make sure the finish looks even, problem spots are addressed, and the property is left tidy. Then we do a final check, pack up, and make sure everything is in good shape before we leave. Biggest Factors That Change How Long It Takes Two homes can be the same square footage and still take very different amounts of time. Here are the real drivers that determine whether your job is closer to two hours or closer to eight. Home Size And Total Exterior Surface Area Square footage helps, but it doesn’t tell the whole story. Exterior wall area, the shape of the home, and how much “surface complexity” exists are often more important than the home’s interior size. A simple rectangle home is faster than a home with many bump-outs, deep eaves, and multiple architectural sections—even at the same square footage. One Story Vs Two Story (Access And Safety) Two-story homes take longer because access and repositioning are part of the job. Moving ladders, working from safe angles, and completing a consistent finish at height naturally slows the pace. It’s not just time, it’s also technique. A careful approach protects both the home and the people working on it. Exterior Material (Stucco, Painted Surfaces, Brick) In Arizona, stucco is extremely common. Stucco and painted surfaces often require a more controlled method than flat concrete, and that affects pace. The goal is to clean effectively without damaging the surface. When the method is surface-appropriate, results are better and risk is lower. Dirt Level And Stain Type Light dust film is one thing. Heavy buildup on shaded walls or staining from sprinklers is another. The more stubborn the buildup, the more time is needed for application, dwell, and detail work. This is where “it depends” becomes real. Architecture And Detailing Tight side yards, tall entryways, narrow walkways, and lots of trim details all add time. So do areas with dense landscaping that require extra care to access. The biggest timeline surprises usually come from homes that look simple from the street but have complex access on the sides and back. Water Access

How To Clean Window Screens: Easy Steps For Clear Views
Blog

How To Clean Window Screens

Window screens do a lot of quiet work. They let fresh air in, keep bugs out, and soften harsh sunlight. But they also act like a giant dust filter. In Arizona, that builds up fast. Desert dust, pollen, and monsoon grime can turn screens gray and block airflow. Even if your windows are spotless, dirty screens can make the whole view feel dull. This guide walks you through the safest ways to clean window screens. You’ll get a deep-clean method for removable screens and a quick-clean method for screens you can’t take out. We’ll also cover what to avoid, how often to clean in the Phoenix Valley, and when it’s time to repair or replace. The Safest Way To Clean Window Screens Most window screens clean up best when you remove them first. Then you rinse gently, wash with mild soapy water, rinse again, and let them dry completely before reinstalling. The key is staying gentle. Screens bend more easily than people expect, and high pressure can stretch the mesh. If you keep the water pressure low and use a soft brush, you’ll get a clean finish without damage. If you can’t remove the screens, a vacuum and microfiber wipe-down can still make a big difference. It’s a great maintenance option between deep cleans. What You’ll Need Before you start, gather a few simple supplies. Most homeowners already have everything needed. The goal is a soft clean that lifts dust without scratching or warping the screen. Basic Supplies A bucket or tub is helpful, but not required. Warm water and a mild dish soap do most of the work. You’ll also want a soft-bristled brush or microfiber cloth. A garden hose on low pressure works well for rinsing. A few towels make drying easier. Optional “Nice To Have” Tools A vacuum with a brush attachment is great for dry dust removal. It keeps you from turning dust into mud. White vinegar can help with stubborn grime in some cases. A drop cloth or old towel can protect floors if you’re cleaning indoors. Step-By-Step: Deep Clean Screens You Can Remove This method is the best choice when screens look gray, airflow feels reduced, or you’re doing a seasonal reset. It’s also the fastest way to get that “bright screen” look back. Plan for a little time up front. The results usually last longer than a quick wipe-down. Step 1 — Remove The Screen Without Bending The Frame Start by locating the screen tabs or pull points. Many screens have tabs at the bottom, sides, or inside the frame. Support the screen with both hands as you release it. Take it out slowly. Avoid twisting the frame. If you’re cleaning a lot of screens, label them by room with painter’s tape. It makes reinstalling easier and keeps everything in the right spot. Step 2 — Dry Dust First So You Don’t Make “Mud” Before you use water, remove loose dust. This step makes washing easier and keeps rinsing cleaner. A vacuum with a brush attachment works well. A soft brush can also work if you do it outside. Do both sides if you can. Screens often hold dust on the exterior side and fine debris on the interior side too. Step 3 — Rinse Gently Use a gentle rinse to knock off loose dirt. Low pressure is important. A garden hose with a soft spray setting is ideal. If you’re cleaning inside, a shower sprayer works too. Rinse both sides. Dust can cling to the mesh and hide until you flip the screen. Step 4 — Wash With Mild Soap Fill a bucket with warm water and add a small amount of dish soap. You don’t need a heavy mix. Dip a soft brush or microfiber cloth into the soapy water. Then scrub gently in one direction. Clean both sides. The outside often looks worse, but the inside holds fine dust that affects airflow. Step 5 — Rinse Until Water Runs Clear Rinse thoroughly until the water runs clear and you don’t feel slick soap residue. Soap left behind attracts dust. It can make screens look dirty again faster. Take your time here. A complete rinse is what helps your clean last longer. Step 6 — Dry Completely Before Reinstalling Shake off excess water. Then set the screen in a safe place to dry. Drying upright is usually best. Lean screens gently against a wall or fence. Avoid placing screens flat on rough surfaces. It can warp frames or imprint dirt back into the mesh. When they feel fully dry, reinstall them carefully. Don’t force them into place. If something feels off, check alignment. Quick Clean Method: Screens You Can’t Remove If you live in an apartment, have tall windows, or simply can’t remove certain screens, you can still clean them effectively. The goal here is maintenance. A quick clean won’t replace a full wash. But it will reduce dust and improve airflow. Option A — Vacuum With A Brush Attachment Start with a dry vacuum method. It’s the safest and cleanest first step. Use a brush attachment and work top to bottom. Use light pressure so you don’t push the mesh out of shape. If you can access both sides, repeat on the other side. Even one side makes a visible difference. Option B — Microfiber Wipe-Down After vacuuming, wipe the screen with a slightly damp microfiber cloth. Do long, gentle strokes. Don’t scrub in circles. Follow with a dry microfiber cloth if possible. This helps prevent streaking and keeps dust from clumping. Option C — Light Mist And Gentle Wipe If dust is stuck, use a light mist of water on the microfiber cloth. Avoid soaking the screen. Wipe gently, then dry with a clean cloth. The goal is controlled moisture, not a full rinse. Common Mistakes That Ruin Screens Most screen damage comes from trying to clean too aggressively. A careful approach is safer and usually gives a better result. If you avoid these mistakes, screens will last

How Much Does Solar Panel Cleaning Cost in Phoenix, AZ
Blog

How Much Does Solar Panel Cleaning Cost in Phoenix, AZ?

Solar is a smart move in Phoenix. We get the sunshine for it. But we also get the dust for it. Between desert wind, construction in growing neighborhoods, and monsoon season residue, solar panels can collect a film of grime faster than most homeowners expect. You might not notice it from the ground, but you’ll often see it when the light hits just right—or when rain dries and leaves a fine layer behind. So what does professional solar panel cleaning cost in Phoenix, AZ? In most cases, solar panel cleaning in Phoenix runs about $150 to $300 per visit for a typical residential system. Many companies also price it as $10–$20 per panel, with the total changing based on panel count, roof height, access, and overall condition. This guide breaks down common local price ranges, what changes the cost, how to estimate your system, and how to compare quotes so you can book with confidence. Typical Solar Panel Cleaning Prices in Phoenix If you want the fast answer first, here’s what homeowners typically see in Phoenix: Typical visit cost: $150–$300 for many residential systems Per-panel pricing: often $10–$20 per panel Small systems (8–15 panels): commonly $150–$225 Medium systems (16–30 panels): often $200–$350 Large systems (30+ panels): typically $350–$600+ Typical cleaning frequency: 1–2 times per year for many homes Annual total for most homeowners: about $150–$500, depending on frequency and system size You’ll also see a “minimum service fee” in many quotes. That’s normal. Even a smaller system requires safe roof access, setup, and professional equipment. Cost Breakdown by System Size The simplest way to think about solar panel cleaning pricing is by system size. Not because every company uses the same brackets, but because it helps you estimate what’s realistic before you request quotes. Small systems (8–15 panels): $150–$225 Smaller systems often fall close to the minimum service fee. Even if you have eight panels, the crew still has to arrive, set up for safe roof work, and complete a careful clean. These systems are common on smaller homes or homes with limited roof space. The work is usually straightforward, and the price is driven more by access than panel count. Medium systems (16–30 panels): $200–$350 This is a very common range for typical Phoenix households. At this size, panel count starts to influence price more clearly, especially if the array spans multiple roof sections. If your panels are all in one easy-to-reach area, you’re often toward the lower part of this range. If the system is split across different planes of the roof, the total may rise because it adds movement, setup adjustments, and time. Large systems (30+ panels): $350–$600+ Large systems require more time, and they may also require more careful routing for access. Some providers offer better per-panel rates at higher volume, but harder access can offset that. If your system is large and easy to reach, you can sometimes get a relatively efficient per-panel price. If it’s large and complex—multiple roof sections, steep pitch, tight edges—the total typically increases. How Solar Panel Cleaning Is Priced in Phoenix Most companies price solar panel cleaning in one of three ways. Understanding the approach helps you compare quotes fairly. Per-panel pricing Per-panel pricing is common because it feels simple. You count your panels and multiply. In reality, per-panel pricing is usually a starting point. The provider still needs to factor in roof height, access, roof type, and overall condition. That’s why two homes with 20 panels might get different totals. Flat-rate packages Many companies offer a flat-rate package for a “standard residential system.” This is usually based on typical panel count and typical access. Flat-rate can be a good deal when your system matches the norm. It can also be confusing if the quote doesn’t clearly say what is included or what triggers a higher price. When you get a flat-rate quote, ask one simple question: “Does this include my full panel count and my roof height?” Minimum service fees Minimum fees are common in Phoenix, especially for smaller systems. A minimum fee usually covers: Travel time and scheduling Roof safety setup Professional equipment and water system Cleaning time and cleanup It’s not a penalty. It’s simply the base cost of doing the job professionally. What Impacts Cost the Most in Phoenix Solar panel cleaning isn’t just about how many panels you have. In Phoenix, environment and access play a big role. Panel count and layout Panel count matters, but layout can matter just as much. A single array on one roof plane is faster than a system split across multiple roof sections. Split layouts add time because crews need to reposition and work more carefully around roof lines and edges. Roof height and accessibility Single-story roofs are generally simpler to service than two-story roofs. Height adds safety requirements and setup time, and it can limit access points. If your roof has tight access, narrow walk areas, or steep slopes, the job becomes more technical, and the price often rises accordingly. Roof type and pitch Phoenix homes vary. You may have: Tile roofing Flat or low-slope roofing Steeper-pitched sections The surface and slope affect safety and time. A roof that’s easy to move on is typically faster than one that requires slower, more controlled movement. Dust levels and panel condition Dust is normal here. But not all dust is equal. Some neighborhoods deal with heavier dust because of nearby construction, open desert areas, or more frequent wind exposure. Monsoon residue can also leave a different type of buildup that doesn’t rinse away easily. If panels haven’t been cleaned for a long time, the cleaning may take longer—especially when the buildup includes bird droppings or stuck-on residue. Equipment choice (deionized or purified water) Some companies use purified water systems designed to reduce mineral spotting. This can be a premium approach and may place pricing toward the higher end of the range. In Phoenix, water quality matters. Mineral deposits can leave marks if the cleaning process isn’t done correctly. That’s

Blog

How Much Does Window Tinting Cost in Mesa, AZ?

Mesa gets the full Arizona sun. Long, hot summers. Bright glare in the afternoons. Rooms that feel fine in the morning and then turn into ovens by 3 p.m. If you’ve been thinking about residential window tinting, you’re probably asking the same question most homeowners ask first: How much does window tinting cost in Mesa, AZ? The honest answer is: it depends on your glass, your goals, and the film you choose. But you can get a reliable ballpark before you request a quote. In Mesa, most professional residential window tinting projects typically fall into a few common pricing patterns: Smaller scopes or a few key windows can start in the low hundreds. Full-home projects often land in the mid-hundreds to a few thousand, depending on total glass area and film type. Specialty options like security film or smart tint cost more because materials and installation are more involved. At AZ Window Services, we’re a local, family-owned company serving the Phoenix Valley, including Mesa. We install solar film, decorative film, security film, and smart tint solutions designed to bring comfort to the spaces you live, work, and play. This guide will break down real-world pricing ranges, what affects cost, and how to estimate your project before you call. Typical Window Tinting Prices in Mesa, AZ If you just want a clear starting point, here are the most common installed price ranges homeowners see for flat glass window film (homes and buildings). Window film is often priced per square foot installed, because windows come in many shapes and sizes. A practical Mesa range looks like this: Basic solar/UV film: $5–$10 per sq. ft. installed Decorative / privacy film: $6–$12 per sq. ft. installed Security window film: $8–$14 per sq. ft. installed High-performance (ceramic-style) solar film: $10–$18+ per sq. ft. installed Smart tint / switchable privacy film: $50–$100+ per sq. ft. installed Those ranges shift based on access, window shape, and the specific product selected. Larger projects often receive better per-foot pricing than small “one-room” installs, simply because setup and mobilization are spread across more glass. What You’re Actually Paying For Pricing makes more sense when you know what goes into a professional install. Window tint isn’t just “sticking film on glass.” Film quality and performance Higher-performing films typically cost more because they’re engineered to reject more heat and reduce glare while staying clearer. Some films also have specialty features, like added strength for safety/security or custom decorative finishes. Professional installation and prep A clean, long-lasting install requires careful prep, precision cutting, proper alignment, and finishing. Rushed installs can lead to edge issues, contamination under film, or uneven appearance—especially in bright Arizona light. Your specific windows (size, shape, access) Two homes can have the same number of windows but very different total glass area. A few big sliders can equal the same square footage as many smaller windows. Access also matters—tall entry glass, stairwells, and second-story windows take more time. Cost Breakdown by Film Type Different films solve different problems. The best “value” isn’t always the cheapest film—it’s the one that actually fixes what’s making your home uncomfortable. Solar Film Pricing in Mesa Solar film is the most common choice in Mesa because it targets the biggest issues: heat and glare. Solar film pricing commonly falls between $5–$18+ per sq. ft. installed, depending on performance level. If your goal is maximum comfort in west-facing rooms, it’s often worth choosing a higher-performing option. Decorative and Privacy Film Pricing Decorative film is popular for bathrooms, sidelights, entry glass, and offices within the home. It can create privacy without heavy curtains or blinds. Decorative film often runs $6–$12 per sq. ft. installed, depending on the pattern, frosting level, and layout complexity. Simple frosted panels are typically more affordable than custom designs or multi-section layouts. Security Film Pricing Security window film strengthens glass and helps hold shattered glass together. Homeowners often choose it for added peace of mind on vulnerable windows and doors. Security film commonly ranges $8–$14 per sq. ft. installed, with pricing influenced by thickness, attachment methods, and the glass type. Security installs may involve additional finishing details compared to standard solar film. Smart Tint Pricing Smart tint (switchable privacy) is a specialty category. It can change from clear to opaque when activated, making it a modern alternative to blinds in certain spaces. Smart tint is typically priced far higher than standard films—often $50–$100+ per sq. ft. installed—because it’s a different system with different materials and installation requirements. What Impacts Window Tinting Cost in Mesa? Mesa pricing isn’t random. It’s driven by a few predictable factors. Total glass area This is the biggest driver. A home with fewer but larger windows can cost more than a home with many small windows—because the total square footage is higher. Window type and complexity Standard rectangular windows are the most efficient to tint. These features tend to increase time and cost: Arched or specialty shapes French panes or divided sections Tall entryway glass and stairwells Skylights or hard-to-reach windows One-story vs two-story access Second-story windows often add labor due to safe access, ladder setup, and slower detail work. It doesn’t mean “twice the price,” but it does affect the quote. Interior vs exterior application Most residential films are installed on the interior. In certain situations, exterior-rated films may be recommended. Exterior application can change pricing due to access, conditions, and product choice. The problem you’re solving If your main goal is heat reduction in the hottest rooms, you’ll likely select a higher-performing solar film. If your goal is privacy for a bathroom window, decorative film may be the best value. If you’re addressing safety concerns, security film becomes the priority. How to Estimate Your Window Tinting Cost Before You Call If you want a quick ballpark, you can estimate your total glass area and apply a per-square-foot range. Step 1: Count the windows you want tinted Decide whether you’re tinting: A few key windows A specific side of the home The whole home Step 2: Estimate

Window Cleaning

How Much Does Window Cleaning Cost in Phoenix, AZ?

Phoenix windows don’t stay clean for long. Between desert dust, windy days, construction in growing neighborhoods, and monsoon season streaking, your glass can go from “just cleaned” to “noticeably dull” faster than you’d expect. And if you have hard water buildup or screens that trap dust, it can feel like the view never fully clears. So what should you expect to pay for professional window cleaning in Phoenix, AZ? Most residential window cleaning projects in the Phoenix area typically land between $100 and $400+, with many homeowners paying around $165–$180 for an average home. Pricing is often quoted as $5–$15 per window or $6–$10 per pane for inside-and-out cleaning, depending on your home, the style of windows, and what’s included. In this guide, we’ll break down the most common pricing models, what changes your cost, what’s typically included, and how to compare quotes so you know you’re getting real value—not a surprise upsell. Typical Window Cleaning Prices in Phoenix For most homes in Phoenix, window cleaning costs usually fall into a few practical buckets: Typical residential total: $100–$400+ Average home range: around $165–$180 Per window: often $5–$15 depending on what’s included Per pane: commonly $6–$10 per pane for inside/outside cleaning Minimum service fee: many companies have a minimum, often around $100–$250, especially for smaller jobs Why minimums matter: even a small project requires travel, setup, safety checks, and cleanup. For smaller homes or just a few windows, the minimum fee often drives the final price more than per-pane math. If you want the most accurate number, the best approach is a quote based on your window count, stories, access, and service level (exterior-only vs full-service). Phoenix Window Cleaning Cost Breakdown: Per Pane, Per Window, Per Home Different companies price window cleaning in different ways. Understanding the model helps you compare quotes fairly. Per-pane pricing (what it means) A “pane” is a single section of glass. Some windows are one pane. Others—like French panes—have many panes in one window frame. Per-pane pricing is common when homes have lots of divided windows, because it reflects the extra time required. In Phoenix, per-pane pricing is often used when customers want inside-and-out cleaning, screen cleaning, and more detailed work. A typical per-pane quote may vary based on: Exterior-only vs inside/out Story height and accessibility Window style (standard pane vs small, divided panes) Per-window pricing (common for simpler homes) Per-window pricing is often used when most windows are standard, larger panes. It works well for homes with sliders, picture windows, or a consistent window style. The key question here is: what does “per window” include? Some companies price a basic exterior wipe as a “window,” while others include full inside/out cleaning. The same word can mean different scopes. Flat-rate/project pricing (most common for full homes) Many professional window cleaners quote the whole home rather than giving you a long per-pane list. This is often the most practical approach because it accounts for the real-world complexity of the job—like access, screens, tracks, and overall condition—without turning your quote into a math worksheet. Flat-rate quotes can be great, as long as you confirm what’s included. Price Ranges by Home Type (Real-World Examples) Every home is different, but these examples give you a realistic sense of how pricing tends to scale in Phoenix. Small home, condo, or townhouse Smaller homes with fewer windows and easy access often fall toward the lower end of the pricing range. Exterior-only service can keep costs down, especially if the glass is standard and there aren’t many screens or specialty windows. This is also where minimum fees show up most. Even if the job is quick, companies still have a baseline cost to cover time and logistics. Typical single-story Phoenix home This is the most common “average” scenario: one story, a mix of standard windows and a few sliders, and a typical number of screens. Pricing in this category depends heavily on whether you want: Exterior-only cleaning (faster, lower cost) Inside-and-out cleaning (more time, higher value for clarity) Add-ons like screens, tracks, or hard water treatment Two-story or multi-level home Two-story homes typically cost more because access takes more time and safety planning. Even if your window count is similar to a single-story home, the second-story windows slow the process. Some companies apply an “upper-level” add-on per window or per pane. Others roll it into the project quote. Homes with French panes or specialty glass French panes can increase cost because what looks like “one window” may actually be many separate panes, each requiring careful cleaning for a streak-free result. Specialty windows—like tall entryway glass, transoms, or awkward angles—can also add time. In window cleaning, time is the real driver, and specialty glass simply takes longer to do well. What Impacts Window Cleaning Cost in Phoenix? This is where pricing becomes predictable. If you know the “quote drivers,” you can estimate your likely range before you even call. Number of windows and total panes More glass means more time. But it’s not just window count—it’s total panes. Ten big panes can take less time than twenty small panes. One-story vs two-story access Second-story windows usually increase cost because of ladder work, additional setup, and the slower pace required for safe, thorough cleaning. Window types (sliders, picture windows, French panes) Standard sliders and large panes are efficient to clean. French panes are more detailed. Some homes also have narrow sidelights, transom windows, or decorative shapes that require extra care. Service level: what you’re actually paying for This is the biggest “hidden” difference between quotes. Exterior-only cleaning is usually the lowest-cost option. It removes the outside dust, spots, and grime that dull your view. Inside-and-out cleaning is the most popular choice for homeowners who want the glass to look truly clear. Full-service cleaning often includes screens, tracks, and a deeper detail clean—this is where the cost increases, but so does the “wow” factor. Condition issues: hard water, buildup, and residue Phoenix has plenty of hard water and mineral buildup, especially on windows exposed to

How Much Does Pressure Washing Cost in Phoenix, AZ
Blog

How Much Does Pressure Washing Cost in Phoenix, AZ?

Phoenix exteriors get dirty in a very specific way. It’s not just “normal grime.” It’s desert dust that sticks to everything, wind that pushes dirt into textured surfaces, and monsoon season that can leave streaking and spotting on walls, patios, and driveways.  Add in driveway oil drips, pool deck buildup, and shaded-side algae in certain areas, and it’s easy to see why homeowners here search one question again and again: How much does pressure washing cost in Phoenix, AZ? In most cases, pressure washing in Phoenix typically falls between $173 and $311 for a standard driveway, patio, or small exterior job. Many homeowners spend around $299 to $394 when they’re doing a larger scope or bundling multiple areas. Pricing is often quoted by the project, but you’ll also see per-square-foot ranges—commonly $0.10 to $0.50 per square foot, depending on surface type, stain severity, and access. Below, we’ll break down price ranges by project type, what changes the cost, how professionals price jobs in Phoenix, and how to estimate your cost before you call. Typical Pressure Washing Prices in Phoenix If you want the “fast answer,” here’s what most Phoenix homeowners experience: Typical smaller projects (driveway/patio): $100–$250 Common bundled residential projects: $250–$600+ Per-square-foot pricing: often $0.10–$0.50/sq ft (varies by surface and condition) Specialty cleaning (quoted separately): services like roof cleaning are usually higher because the method and risk are different A simple way to think about it: the bigger the area, the more time and water it takes—but in Phoenix the surface type and stains often matter just as much as size. At-a-glance Phoenix price ranges by project type These are common ranges homeowners see when comparing quotes: Driveway: $100–$250 Patio/pool deck: $100–$200 House wash (stucco/exterior walls): $150–$1,400+ (depends heavily on size and stories) Fence/block wall: $150–$300+ (depends on length and staining) Gutters: $50–$300 (scope varies) Roof cleaning: $450–$800+ (typically separate method and pricing) Keep in mind: these are typical ranges, not a fixed price list. The best way to get a confident number is a quote based on your square footage, surfaces, and condition. Phoenix Cost Breakdown by Project Type When homeowners search “pressure washing cost,” they usually mean one of these high-intent projects. Here’s how each category typically prices out in the Phoenix area and what changes the final total. Driveway pressure washing cost (Phoenix) Driveways are one of the most common pressure washing jobs because they impact curb appeal immediately. A clean driveway makes the whole front of the home look brighter and better cared for. Most Phoenix driveway cleanings land around $100–$250, depending on: Size (one-car vs two-car vs extended driveway) Material (standard concrete vs exposed aggregate) Staining (oil drips, tire marks, rust spots) How long it’s been since the last wash If your driveway has oil staining, the biggest cost driver isn’t just washing—it’s treatment time. Some stains lighten dramatically, while older, deep oil stains may improve but not fully disappear. A reputable company should be honest about what to expect. Patio and pool deck cleaning cost Patios and pool decks get used constantly in Phoenix, and they collect a mix of dust, sunscreen residue, and tracked-in dirt. Pool decks can also develop slick buildup, especially in shaded areas or where water frequently splashes. Most patios and pool decks typically range from $100 to $200 for standard cleaning. Costs tend to rise when: The deck is large or wraps around the pool The surface is pavers, travertine, or textured material that holds dirt Furniture needs moving There’s heavy grime or algae/mildew in shaded areas If you entertain or use your outdoor space daily, patio and pool deck cleaning is one of the best “comfort upgrades” you can do—because it changes how the space feels under your feet. House wash / exterior siding cost (common for stucco homes) Most Phoenix homes are stucco, and that matters because stucco isn’t a “blast it with high pressure” surface. In many cases, the safest, most effective method is soft washing—a lower-pressure cleaning approach designed to remove dirt and buildup without damaging finishes. House wash pricing varies widely because exterior walls involve: Total wall area (square footage) One-story vs two-story access Window layout, trim, and architectural features Condition (dust film vs heavy buildup) Delicate surfaces that require gentler methods You’ll see house wash quotes as low as $150–$300 for smaller, straightforward scopes, and as high as $850–$1,400+ for large, multi-story homes or full exterior refresh projects. If your goal is “make the home look brighter and cleaner,” a house wash is often the most visible transformation—especially on the shaded sides of the home where grime builds up slowly. Fence and block wall washing cost Block walls are a signature Phoenix feature, and they collect dust like a magnet. Irrigation overspray can also cause mineral staining, and shaded sections can develop greenish buildup over time. Most fence and block wall cleanings commonly range $150–$300+, and cost increases with: Total perimeter length Height and accessibility Staining severity (including efflorescence or mineral deposits) The need for targeted stain treatment Walls often get bundled with driveway and patio cleaning because they’re usually part of the same “exterior reset” goal. Gutters (optional add-on) Gutter cleaning costs vary because companies don’t always include the same scope. Some quotes include only debris removal; others include rinsing and a quick exterior wipe-down. In Phoenix, gutters collect dust, leaves, and roof grit—especially after storms and windy days. Expect $50–$300 depending on: Home size and number of gutters Story height Level of debris What “included” means in the quote Roof cleaning (separate scope and pricing) Roof cleaning is typically priced separately and higher than standard pressure washing because the method, risk, and time involved are different. Roof materials can be damaged by improper pressure, and safe cleaning requires a controlled approach. In Phoenix, roof cleaning commonly runs $450–$800+, depending on roof size, pitch, material, and the type of buildup being addressed. If a company is quoting roof “pressure washing” casually without explaining the method, that’s a red flag—roof cleaning should be

How Long Does Residential Window Tinting Take
Window Tinting

How Long Does Residential Window Tinting Take?

If you’re thinking about tinting your home’s windows, one of the first questions that comes up is simple: how long will this take? You want the comfort benefits—less heat, less glare, better UV protection—without turning your house into a construction zone for days. The good news is that most residential window tinting projects are completed within one working day, and in many homes it’s even faster. The more important part is understanding what “time” really means in window tinting, because there are two timelines that matter: Installation time (how long our team is physically working in your home)  Curing time (how long the film takes to fully settle and look crystal clear) Below, we’ll walk through realistic timeframes, what affects your project length, what to expect on install day, and how to prepare so everything goes smoothly. At AZ Window Services, we’re big on setting clear expectations. We’re a local, family-owned company in the Phoenix Valley, and our goal is to make your home feel more comfortable year-round—with a process that feels easy and respectful from start to finish. Typical Timeframes for Residential Window Tinting A helpful average is about 30–45 minutes per window for standard residential windows with good access and no unusual prep. That doesn’t mean you multiply your window count and you’re done—installers work efficiently across the home, and some windows take much less time while a few take longer. Here’s what homeowners usually experience: A small home with 5–10 windows often takes 2–4 hours. A medium home with 10–20 windows commonly takes 4–6 hours. A larger home with 20+ windows may take 6–8+ hours, and occasionally it can extend to a full day or be split depending on complexity. In most cases, your project is completed in one working day, especially when the windows are standard shapes and easy to access. If your home includes tall entryway glass, a lot of French panes, skylights, or old film removal, it can take longer. Now let’s make the most important distinction. Installation Time vs Curing Time (Don’t Mix These Up) When people say “how long does tinting take,” they’re usually talking about the install day. But window film has a natural settling period. Understanding that cures a lot of worry. Installation time: what happens the day we’re there Installation time is the hands-on part. It includes preparing the workspace, deep cleaning the glass, applying the film, smoothing it out, trimming it precisely, and finishing the edges so it looks clean and professional. For most homes, the actual “in-your-space” portion is measured in hours, not days. We work room by room so your home stays livable throughout the process. Curing time: what happens after we leave Curing time is the period when the moisture between the film and the glass evaporates fully and the film settles into its final appearance. Most residential films cure in roughly one to two weeks, depending on indoor temperature, sunlight exposure, humidity, and the specific film. During curing, it’s normal to notice mild haziness, faint streaks, or small moisture patterns that gradually disappear. That doesn’t mean something went wrong—it’s part of how film settles. If you’re in Phoenix, curing usually moves along well because we get consistent warmth and sunlight, but every home is a little different. What Affects How Long Your Home Takes? Two homes can have the same number of windows and still take very different amounts of time. Here are the factors that most often change the timeline. Window count and total glass area This is the biggest driver. Ten small windows can go faster than five massive panes. Large sliders, picture windows, and tall entry glass add time because there’s simply more surface area to prep and finish properly. Window size, layout, and style Standard single panes are usually straightforward. Where timelines grow is in “detail windows,” like: French panes (multiple small panes in one door or window)  Windows with grids or tight corners  Arches and specialty shapes  Oversized floor-to-ceiling glass More edges and corners mean more precision cutting and finishing. Accessibility and height Second-story windows, stairwell glass, tall entryways, and tight exterior landscaping can slow things down. Safe access takes planning, and the film still needs to be installed with the same clean standard. If your home has areas that require ladders or unusual angles, it doesn’t mean it can’t be done—it just means we budget the time properly. Condition of the glass and frames A perfect finish starts with clean glass. If the windows have: Heavy dust buildup  Construction residue  Paint overspray  Hard water spots  Oils from hands or prior cleaning products …then the prep and cleaning stage can take longer. This step matters because film magnifies what’s underneath. Good prep is the difference between “looks okay” and “looks flawless.” Old film removal If you have old tint or aging film, removing it can add meaningful time. Removal includes peeling, adhesive cleanup, and re-cleaning the glass so the new film can bond correctly. It’s a common situation in Phoenix, especially in homes that have had prior upgrades. Film type and your goals Most solar and ceramic films are installed in a similar way. But certain categories can add time: Decorative film with patterns, bands, or custom layouts  Security film (thicker material and sometimes more finishing detail)  Smart tint solutions (a different scope than standard film) The “right film” depends on what you’re trying to solve—heat reduction, glare control, privacy, safety, or style—and we tailor the plan around that. Step-by-Step: What Happens During a Residential Tint Install If you’ve never had window film installed before, it helps to know what the day looks like. This is the typical flow for a residential project. 1) Walkthrough and confirmation We start with a quick walkthrough to confirm which windows are being tinted and what your goals are. In Phoenix, the most common priorities are heat reduction and glare control, especially in west-facing rooms, home offices, and open living areas with large glass. This is also when we confirm film selections,

What To Expect During A Window Tint Installation
Window Tinting

What To Expect During A Window Tint Installation

Window tinting is one of those upgrades that can make your home feel noticeably better—cooler rooms, less glare, and better protection from the sun—without changing the way your space looks or functions. But if you’ve never had residential window film installed before, it’s completely normal to wonder what the process is like. Will installers need to move furniture? Will it be messy? How long will it take? What will the windows look like right after? And what should you do (or not do) once the film is installed? Below is a clear walk-through of what happens before, during, and after a professional window tint installation in your home. The Installation Experience in One Pass Here’s the big picture. On installation day, we arrive, confirm the plan, protect your space, and work through your windows in a consistent, room-by-room process. The core stages include deep cleaning the glass, cutting and fitting the film, applying it carefully, smoothing it out, finishing the edges, and doing a final quality check. Most homeowners are surprised by how “normal” the day feels. There’s no demolition, no loud equipment, and no major disruption. The biggest thing you’ll notice is that we take cleaning seriously, because a clean surface is what makes the finished result look smooth and professional. After we’re finished, you’ll receive aftercare guidance. Your windows may look perfect immediately—or you may notice slight haziness, light streaks, or small moisture patterns at first. That’s part of curing and typically clears as the film settles. Before We Arrive: Scheduling, Planning, and Simple Prep A smooth installation starts before the appointment. Not because you need to “prepare the house” in a big way, but because a little planning helps us protect your time and deliver the best result. The quote and game plan During scheduling (or your quote), we confirm the essentials: Which windows are being tinted  What you want to fix (heat, glare, UV exposure, daytime privacy, security, or a combination)  Which film type matches that goal (solar film, decorative film, security film, or smart tint solutions)  Any window-specific concerns (tall entry glass, French panes, old film, hard water spotting) This is also when we clarify expectations. Window tinting isn’t one-size-fits-all—especially in Phoenix, where the sun is intense and different rooms heat up differently throughout the day. A quick conversation about your “problem windows” helps us recommend the right approach. What you should do before the appointment You don’t need to rearrange your whole home. A few simple steps are plenty: Clear a couple of feet around the windows where possible (small decor items, plants, or delicate pieces).  Secure pets so they’re comfortable and out of active work areas.  Let us know in advance if you suspect old tint is present or if windows are heavily soiled.  Identify priority rooms—like west-facing living spaces or a home office—so we can tackle those early.  That’s it. The rest is on us. Step-by-Step: What Happens During the Installation Every professional installer has their own workflow, but a quality residential installation follows a reliable structure. Here’s how it typically looks with our team. 1) Walkthrough and protecting your space We start with a short walkthrough. We confirm the window list, the film selection, and your goals. If any windows need special attention—like a high entryway pane, a tight corner, or a glass door with multiple small sections—we plan the order so the process stays efficient. Then we protect your space. We keep tools tidy, use protective coverings as needed, and work carefully around sills, trim, and nearby surfaces. This is a detail-oriented service, and we treat your home with respect. 2) Deep cleaning the glass (the most important part) Homeowners often underestimate how much of a window tint installation is “invisible work.” The truth is that the best-looking tint jobs are built on preparation. Glass can hold dust, oils, pollen, residue from cleaners, and tiny debris you don’t notice until you’re looking at it through the film. Film doesn’t hide those imperfections—it can make them more noticeable if the glass isn’t properly cleaned. This is why we take deep cleaning seriously. We clean the glass, the edges, and the surrounding area where the film needs to sit cleanly. This step is also where time can vary: a window that looks clean at a glance can still need extra prep to be truly film-ready. 3) Measuring and cutting the film to fit Once the glass is ready, the film must be fit precisely to each pane. Residential windows aren’t always perfectly uniform, and every window has its own shape and edge details. Cutting and fitting the film correctly matters for both appearance and longevity. This is also why specialty windows take longer. Arches, narrow sidelights, and multi-pane designs require more precision and more finishing work. 4) Applying a slip solution and positioning the film Window film is typically installed using a controlled wet application method that helps the film slide into position and allows for clean alignment. This doesn’t mean your home is getting “soaked.” It’s a carefully managed process designed to create a smooth, even bond between the film and the glass. The installer positions the film, aligns it, and prepares it for smoothing. This stage is calm but technical—small movements make a big difference, and we take the time to get it right. 5) Squeegee work: smoothing for a clean finish This is the stage most people picture. The film is smoothed and pressed firmly so moisture is pushed out evenly and the surface becomes uniform. Done correctly, this process creates a clean, consistent look. It’s normal for a small amount of moisture to remain during installation—especially near edges—because the film needs time to settle and cure. The goal is a professional finish that looks smooth and consistent as curing completes. 6) Trimming, edge finishing, and detail work Edge work is where quality stands out. After the film is applied and smoothed, the edges are trimmed precisely and finished so they look clean and intentional. This is also

How Much Does Window Tinting Cost in Phoenix, AZ?
Blog, Window Tinting

How Much Does Window Tinting Cost in Phoenix, AZ?

If you’ve lived through a Phoenix summer, you already know the feeling: the sun hits the glass, the room heats up fast, and your A/C works overtime just to keep things tolerable. Window tinting (also called window film) is one of the most effective ways to make a home or business feel cooler, reduce glare, and protect interiors from sun damage—without blocking the natural light and views you love. So what does it cost in Phoenix, AZ? Most residential and commercial projects are priced by the square foot installed, and your final number depends heavily on the type of film, your glass size and layout, and the installation complexity. Below is a straightforward, Phoenix-specific pricing guide, plus what to expect during a quote and how to compare options confidently. Quick Answer: Phoenix Window Tinting Costs at a Glance In Phoenix, most residential and commercial window tinting falls in the $10–$20 per square foot installed range, depending on film type and performance. Some basic solar films can land lower, while high-performance ceramic and specialty safety or smart films can move higher. A simple way to estimate is to multiply your approximate total glass square footage by your target range. For example, if you estimate 120 sq ft of glass across a portion of your home, you can roughly ballpark the project—then refine the number with a professional quote based on your goals and your exact windows. Phoenix-specific note: because our climate is extreme, many homeowners and businesses choose higher-performance films designed to block heat without making your windows overly dark. That performance is often where the value is. Window Tinting Cost in Phoenix by Film Type Not all window film is the same. “Tinting” can mean anything from a basic heat-reduction film to decorative privacy film, safety/security film, or advanced smart film. Here’s how costs typically break down by category. Solar / Heat-Blocking Film Solar film is the go-to choice in Phoenix because it targets the most common problem: heat gain through glass. It’s designed to reduce heat, reduce glare, and block UV—helping rooms stay comfortable longer throughout the day. Solar film price often depends on performance. Entry-level options may reduce discomfort, but higher-performance films can make a dramatic difference in west-facing rooms, open-concept layouts with large sliders, and homes with big picture windows. Solar film is a great fit if you want: Cooler rooms and more consistent indoor comfort Less glare on screens UV protection to reduce fading of floors, furniture, and artwork Decorative / Privacy Film Decorative film includes frosted looks, patterns, gradients, and custom designs. In homes, it’s popular for bathrooms, sidelights, front doors, and areas where you want privacy without curtains. In commercial spaces, it’s commonly used for conference rooms, glass partitions, and storefront design. Costs here vary based on how detailed the design is and how much custom work is involved. A simple frosted application is typically more straightforward than a complex pattern or a custom logo layout. If you want a clean, modern look and privacy for glass offices, decorative film can be one of the best “visual upgrades” for the money. Security Window Film Security film is designed to strengthen glass and help contain shatter. It adds an invisible layer of strength that can help slow forced entry attempts and reduce the risk of dangerous shards if the glass breaks. The price range for security film is influenced by: The thickness of the film The size of the panes being protected The level of reinforcement desired for the application Security film is especially popular for: Ground-floor windows and doors Storefronts and retail glass Schools, offices, and high-traffic buildings Properties where safety and peace of mind are priorities Premium Ceramic / High-Performance Film Ceramic film is often chosen when you want a high level of heat rejection without the “mirror” look or the darker appearance many people associate with tint. It’s also a great option when you want clearer visibility and a modern aesthetic. Premium films typically cost more because they deliver a bigger performance upgrade, especially in Phoenix. If you love your views but want the heat to stop feeling like it’s pouring through the glass, this is where ceramic and other high-performance lines shine. Ceramic is often a top pick for: Homes with large glass panels and bright views Offices where glare affects productivity Customers who want comfort without changing the look dramatically Smart Film / Smart Tint (Switchable) Smart Tint (like iTint) is a different category entirely. It allows glass to switch from transparent to opaque instantly, giving you privacy on demand. It’s ideal for modern interiors that want flexibility without curtains or blinds. Smart film typically has a higher per-square-foot cost because it involves advanced technology and components beyond standard film installation. It’s often used in: Conference rooms and meeting spaces Glass partitions in offices Luxury home design features Medical, professional, or privacy-sensitive spaces If you’re considering smart film, it’s best to discuss your goals upfront so your quote accounts for the full scope of what you’re envisioning. Residential vs Commercial Pricing in Phoenix Both residential and commercial jobs are usually priced by square footage, but how projects are quoted can differ. Residential: Why Home Quotes Can Vary So Much Homes often include a mix of window sizes, shapes, and access levels. Even two houses with similar square footage can be priced differently if one has tall entryway glass, skylights, arches, or multi-pane French windows. Residential quotes are often influenced by the variety of glass and the time needed to install film cleanly and precisely. The goal is a finished look that feels seamless, with careful edges and a professional fit. Commercial: How Scale Can Improve the Rate Commercial projects often have more consistent window types and larger amounts of glass. That can make installation more efficient and, in some cases, reduce the price per square foot compared to smaller or complex residential jobs. Commercial goals are also more varied. Some businesses prioritize energy efficiency and comfort, while others want

How Much Does Window Tinting Cost in Scottsdale, AZ
Blog, Window Tinting

How Much Does Window Tinting Cost in Scottsdale, AZ?

If you live or work in Scottsdale, you already know the sun isn’t “seasonal.” Heat, glare, and UV show up year-round, and big glass (especially modern homes and storefronts) can feel like a greenhouse at the wrong time of day. So let’s answer the real question in a way that actually helps you plan: what does window tinting cost in Scottsdale, and what makes one quote higher than another? Below you’ll get clear price ranges, a simple way to estimate your project, and how to choose the right film without paying for performance you don’t need. Quick Answer: Typical Scottsdale Window Tinting Costs Residential window tinting in Scottsdale commonly runs about $2 to $18 per square foot, with many homeowners landing around $500 to $1,500 total depending on the film type, window size, and access. Commercial window tinting in Scottsdale commonly runs about $6 to $18 per square foot, with many small-to-mid projects landing around $800 to $2,500. Larger buildings, lift access, after-hours installs, and specialty films can push totals higher. The biggest cost driver is simple: how much glass you’re covering. After that, it’s film performance and installation complexity. Window Tint Cost Table (Scottsdale Price Ranges) These are typical installed ranges you’ll see in Scottsdale. Think of them as planning numbers. Your exact quote depends on glass size, film selection, access, and whether any old film needs removal. Film Type Typical Installed Cost (Per Sq Ft) Best For Standard Solar Film $5–$10 Heat reduction, glare control, UV protection, everyday comfort Ceramic Film (Premium) $10–$18 Highest comfort with clear optics, strong heat rejection without a dark look Decorative / Frosted Film $6–$12 Privacy, conference rooms, bathrooms, partitions, modern design Security Window Film $8–$14+ Glass strengthening and shatter containment (thicker options cost more) Smart Film / Smart Tint $50–$100+ Instant privacy on demand, modern “no blinds” look, high-end spaces A quick note on security film: basic security film can fall into the lower ranges, but thicker films and upgraded attachment/edge systems for higher-risk applications often raise the installed cost. If your goal is “hold the glass together when it matters,” it’s worth discussing the right build for your property instead of chasing the lowest number. Estimate Your Project (Fast, No Guesswork) If you want a realistic ballpark before getting a quote, do this: Step 1: Estimate Your Total Glass Square Footage Measure each window’s visible glass (not the frame). Square feet = (Width in inches × Height in inches) ÷ 144 Add up each window (or estimate a few and multiply if your windows repeat). Step 2: Pick a Film Range From the Cost Table Choose solar, ceramic, decorative, security, or smart. Step 3: Multiply Square Footage × Price Per Sq Ft That gives you a planning range. Quick Examples Example A: 120 sq ft of glass (condo / smaller home section) Solar film at $5–$10/sq ft → $600–$1,200 Ceramic at $10–$18/sq ft → $1,200–$2,160 Example B: 220 sq ft of glass (typical single-family coverage area) Solar film → $1,100–$2,200 Ceramic film → $2,200–$3,960 Example C: 300 sq ft storefront/office glass Commercial solar film at $6–$18/sq ft → $1,800–$5,400 (Access, after-hours, and lift needs can change this quickly.) If you’d rather not measure, that’s normal. A professional measure is fast, and it prevents overbuying film or underestimating labor for tall or hard-to-reach glass. What Actually Changes the Price in Scottsdale? Two projects can have the same square footage and still price differently. Here’s why. Total Glass Area (The #1 Driver) More glass means more film, more prep, and more installation time. Even premium film often looks “reasonable” on a per-window basis until you add up the total square footage. Film Type and Performance Goals Scottsdale homeowners often want one of these outcomes: Cooler rooms without losing daylight Less glare on TVs, monitors, and shiny surfaces UV protection to reduce fading Privacy for street-facing windows or office glass Security so glass is harder to breach and less dangerous if it breaks A modern look with smart tint that switches on demand The more specialized the goal, the more the film (and installation method) matters. Window Height and Accessibility Second-story glass, stairwells, tall entry windows, and commercial storefronts can require extra ladders, extra safety steps, or lift access. That’s not “upselling.” It’s what safe, clean workmanship requires. Existing Film Removal Old film removal can be quick, or it can be a project by itself, depending on age, adhesive condition, and how the original install was done. If removal is needed, expect additional labor. Glass Type and Compatibility Some newer glass packages have coatings that require the right film choice. A good installer will match film to glass to avoid performance issues over time. Complexity of the Layout Lots of small panes, arches, cut-ups, and tight corners take longer than a few clean, large panes. The more precision cutting and finishing needed, the more time on site. Residential Vs. Commercial: Why Commercial Quotes Look Different Commercial tinting isn’t “just more windows.” It’s often a different job entirely. Commercial Projects Are Logistics-Heavy Businesses may need installs scheduled around staff, customers, security procedures, or after-hours access. Larger panes and higher glass often change the equipment required. Commercial Film Often Has Multiple Objectives Many businesses want heat control and glare reduction, but also want privacy film on interior glass, frosted branding, or security film on entry points. When a project combines multiple film types, the plan becomes more custom. ROI Matters More Commercial film is often justified by comfort and operations: fewer hot spots, less glare, more consistent temperatures, and a better experience for employees and customers. In Scottsdale’s climate, the comfort difference can be immediate. Scottsdale Money-Saver: The SRP Rebate (How It Affects Cost) If your property qualifies, SRP offers a rebate that can help reduce your out-of-pocket cost for window film (commonly cited as $1 per square foot for qualifying projects). A simple way to think about it: If your project covers 200 sq ft of glass, a $1/sq ft rebate could mean about

    Elite Shine & Tint Pro

    First Name

    Last Name

    Email

    Phone

    REQUEST FREE QUOTE

    Enquire Now

    Name

    Nathaniel Gilkes

    Dynamic and results-driven leader with 18+ years of operations management, business development, and customer-centric leadership. I specialize in building inclusive, high-performing teams where people want to belong, grow, and succeed. My leadership style is flexible and adaptable, allowing me to engage effectively across all levels—from frontline teams to executive boardrooms, sales to operations, and technical experts to general managers.
    What drives me most? Leading exceptional teams, fostering innovation, and mentoring the next generation of leaders. I thrive in environments that challenge me to implement long-term solutions, scale operations, and drive strategic growth.

    Key Expertise & Accomplishments:

    When I’m not leading in the boardroom, you’ll find me leading in the fitness studio as a Les Mills instructor, inspiring others to fall in love with fitness. It’s not just about working out—it’s about empowering people to be their best selves.

    Maxwell Risi

    Maxwell Risi is the owner and founder of AZ Window services, a small family-owned company in the Phoenix valley.
    With a passion for delivering top-notch services and a commitment to customer satisfaction, I founded AZ Window Services with the vision of enhancing both the aesthetic appeal and functionality of residential and commercial properties through expert window solutions.
    With over 5 years of experience in the industry, I bring a wealth of knowledge and expertise to every project. Having honed my skills through years of hands-on experience, I understand the nuances of window tinting and cleaning, ensuring that each job is completed to the highest standards.

    At AZ Window Services, our mission is simple: to exceed our clients’ expectations with every service we provide. We believe in transparency, professionalism, and integrity, and strive to build lasting relationships with our customers based on trust and reliability. Thank you for choosing AZ Window Services for all your window needs. We look forward to serving you!